9. Creating Campaigns and Ads
Now that you are aware of the factors that influence your campaign and you understand how Google ranks the ads, you are ready to set up your first campaign. Start by logging in to your Google AdWords account.
Creating a campaign
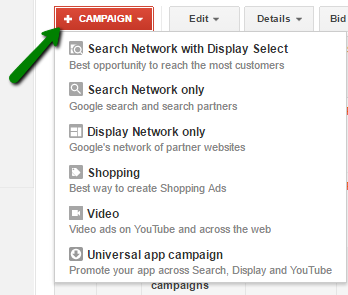
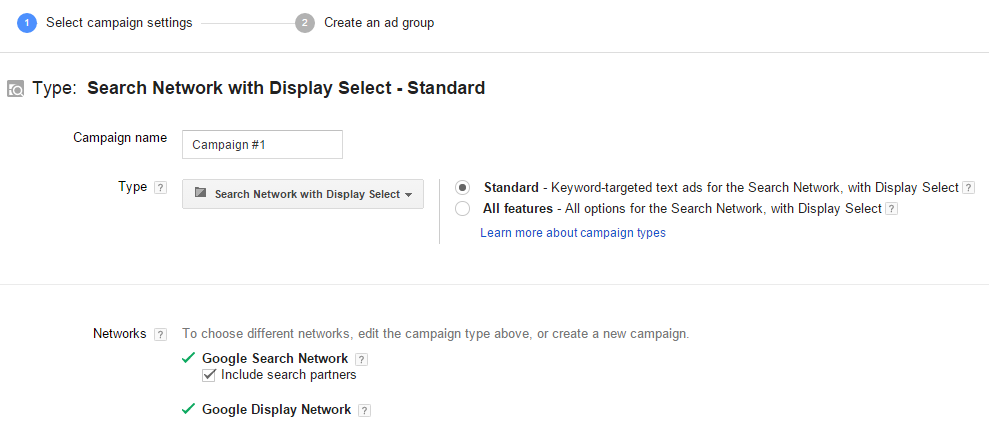
The first thing you will have to do is to create a campaign. You will not be able to create any ads, until you have created a campaign and an ad group for the particular ad. Click on the tab “Campaigns” and find the red button “+Campaign” to create a new campaign. You will have to choose the type of campaign you want to organize first.
Campaign types
The type of campaign depends on both the type of business you run and the goals you want to achieve with the AdWords campaign. You should know that choosing Search Network only will allow you to create text ads, while other options include text, image, rich media and video ads.
You should choose Search Network only if:
- You want the ad to appear next to the search results
- You only want to reach customers who are searching for something, regardless if it is a product or service
Choose Display Network only if:
- You are experienced advertiser and you understand how to take the most out of Google AdWords
- You want to reach customers who are browsing the internet, without looking for an item in particular
- You want to work on branding and introduce your brand to a large audience
The combination of these two is recommended if:
- You are a beginner advertiser and you do not have much experience with AdWord program
- You want to take advantage of both options, and you want your ad to show in both, the search results, and other websites and apps
Use Shopping campaign type if:
- You want a simple and flexible way to organize your Google Merchant Center product inventory
- You want to promote products on Google Search Network and Google Shopping (have in mind that this option is available only in certain countries)
Choose video campaign if:
- You want to advertise videos on YouTube and across the Google Display Network
Universal app campaigns are good:
- When you have an app you want to promote
- Because they promote through all of the Google’s properties, including Google Search, Google Display Network, Google Play, YouTube, etc.
When you want to use cost per install bid strategy
Once you have chosen the type of campaign, you should choose the sub-type of that campaign. You will have to choose between these two sub-types:
- Standard – Choose this sub-type if you want a simpler overview of the campaign. This is especially recommended option for beginners.
- All features – Choose this sub-type if you want to be able to see every option and feature in your campaign. This sub-type is more suitable for experienced advertisers and it allows browsing and adjusting all of the campaign settings.
For the purpose of demonstrating how to create a campaign, and later on how to create an ad, we will choose the option Search Network with Display Select, and All features as campaign sub-type.
Create a campaign
Since we have chosen two networks, Search and Display Network, both of the option will be checked. However, you will still have the option to include or not include Search Partners inside the Search Network.
The following settings in the process of creating a campaign include device, location and language settings. By default, your ad will be displayed on all eligible devices. When it comes to language settings, you should choose the language of those websites suitable for your ads to appear on. Location settings will allow you to include and / or exclude specific countries or territories you want to target or avoid in your campaign.
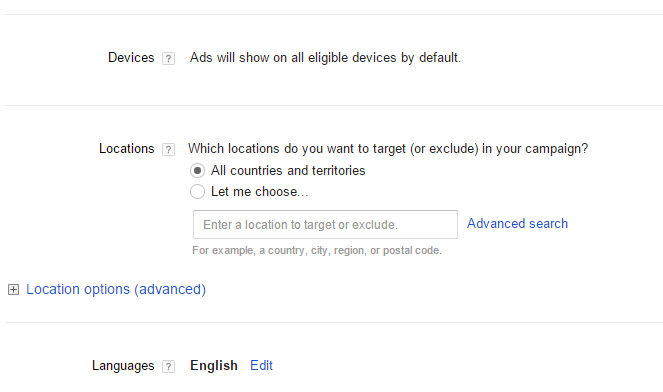
All features sub-type allows advanced options for location. Therefore, you can choose to target or exclude people in your targeted location or people using search queries that are related to your location. A general recommendation is to target both, people who are from the targeted location and are searching for or viewing pages about the targeted location.

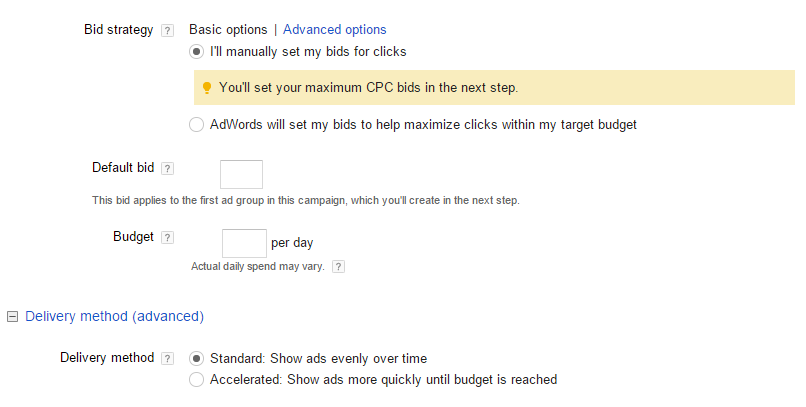
The setting up process continues with choosing the bid strategy and budget. You can either manually set the bids for clicks, which can also be set later on, or you can choose to allow AdWords program to set bids automatically in order to help you maximize the clicks. The second option is recommended for beginners. Default bid represents the most you will pay per click for ads in an ad group. Budget represents the average amount you are willing to spend on your campaign per day.
Delivery options allow you to choose whether your ads will be shown evenly over time, or the ads will be shown more quickly until your daily budget is spent.
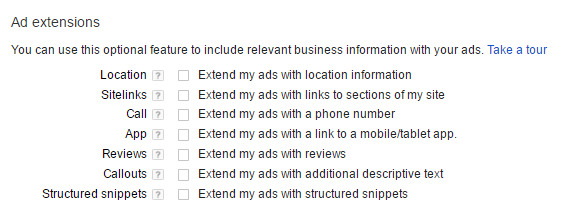
Ad extensions help you enhance your ad with different features, such as reviews, location, call button, etc. which will help you improve the visibility of your ad and increase the number of clicks, resulting in better return on investment. There is no additional cost for adding an ad extension of your campaign. There are manual extensions, which you select in the process of creating a campaign, and automated extension, which are displayed automatically.
Manual extensions include:
- Location
- Sitelinks
- Call
- App
- Reviews
- Callouts
- Structured snippets
Click on the manual extensions you want to include in order to provide additional information that will be featured as the ad extension.
Automated extensions include:
- Consumer rating
- Previous visits
- Seller ratings
- Dynamic sitelink extension
- Dynamic structured snippets
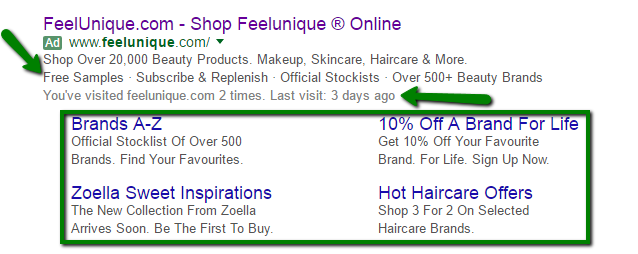
You can choose any of the extensions that are available here. In the example below, the ad has three extensions.
Previous visits – From the automated extension group (Last visit: 3 days ago)
Sitelinks extension – Manual extensions with links to specific sections of the website
Callout extensions – Descriptive text for people to learn about special offers (Free samples, subscribe & replenish, etc.)
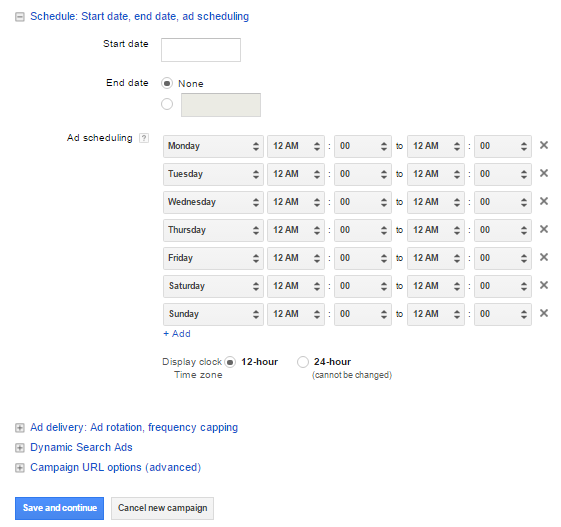
The final part of the campaign settings include advanced settings, which are not available in the standard sub-type of the campaign settings. You will choose:
- Start date of the campaign
- End date of the campaign (if you do not have an end date planned, select None)
- Ad scheduling – If you want your ads to be displayed only on specific days of the week, or in a specific period of the day, use the advanced ad scheduling to choose the time when your ad is going to be shown.
 Additional options include:
- Ad deliver: Ad rotation, frequency capping – This option helps you choose the frequency of your ads showing.
- Dynamic search ads – If you select this option, your website domain will be used to target your ads. Otherwise, you will need to create dynamic ad targets.
- Campaign URL options (advanced) – Use this option to enable URL tracking when you want to find out more about your clicks (desktop traffic versus mobile traffic, traffic from Google Search Network versus Google Display Network, etc.)
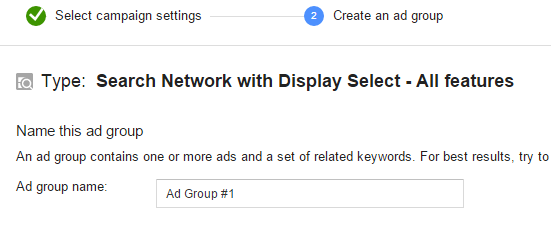
Creating an ad group
The second part of the process of creating a campaign is setting up an ad group. Have in mind that you can save the campaign and proceed to billing without completing this step, and you can then go back to great ad groups. However, you will not be able to run any ads, until you create an ad inside an ad group, and until you have added at least one keyword.
You should name the group. Make sure that the ad group contains at least one ad and a set of keywords that are related to that group.
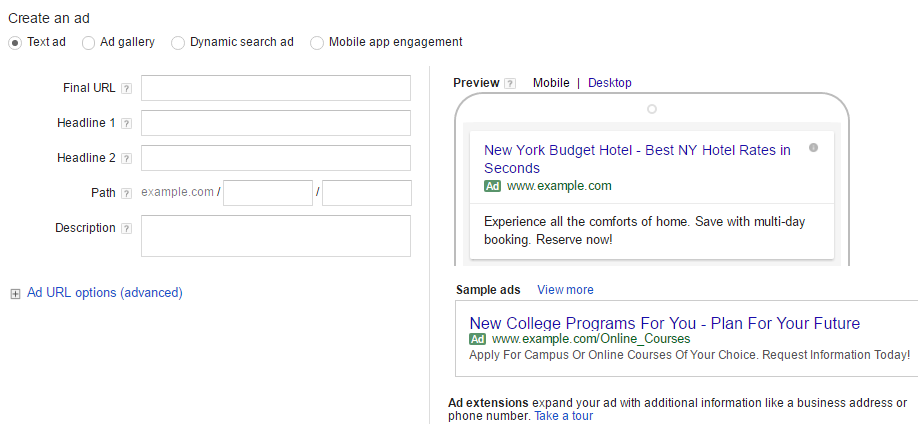
Creating an ad
The next step is to create an ad. Pay attention to the preview on the right, as you fill in the information about the ad. You will be shown the preview of the ad that can appear on the side, as well as at the top of the search result page. You will first choose the format:
- Text ad
- Ad gallery
- Dynamic search ad
- Mobile app engagement
 Have in mind that the format of the ads offered here will also depend on the network you have chosen when you started creating the campaign.
You will then provide the following information:
- Final URL (The URL people will reach once they click on your ad)
- Headline 1 (Up to 30 characters)
- Headline 2 (Up to 30 characters, separated from the headline 1 with a dash)
- Path (Up to 15 characters. It shows the display URL with green letters under the headline)
- Description (Up to 80 characters)
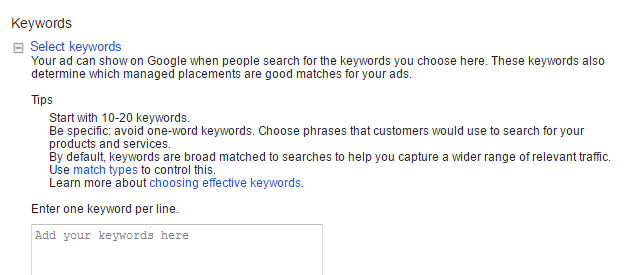
Adding keywords
The next step is to add keywords. Keywords enable Google to associate your ad with a particular search query. Basically the keywords trigger the ad to be shown in the search engine result page.
When adding keywords, you should have in mind the following:
- You should enter one keyword per line
- You should avoid one-word keywords in order to be more specific when targeting your ads.
- Default settings will use broad match, but you can change this by using specific match type.
- Google recommends starting with 10-20 keywords, but you should alter the keywords along the way, based on the results of the campaign and quality score of each keyword.
 You will also be shown the default bid, i.e. the maximum cost per click. The bid you will see here is the same one you have set up on the campaign level. This bid can be set up separately on keyword level later on.
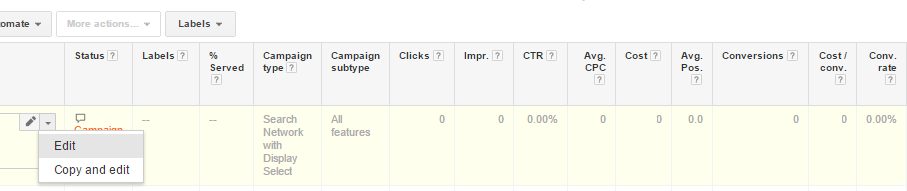
After you have created the ad, it will be displayed in the overview of the ad group inside which it has been created. The overview allows you to monitor different data for each ad, such as CTR, the number of clicks and costs. You can also copy or edit the ad. When editing an ad, you should know that the old ad will be removed and the new edited one will be submitted for review. The removed ad will still be visible inside the line for the removed ads.